


Roady
Active member
'81 Goldwing Standard. Similar on all 1100 models.
The wife has her horse and we own a 1900 house on 5 acres. So, not only am I house-poor, I'm also horse-poor. And three years after my 3rd house "flip", I'm still paying off the credit cards. The original intention when I got this '81 Standard was to clean it up and sell at a profit. I even put together an elaborate thread called Flip This Bike! (Craigslist 2 eBay). But, somewhere along the way I fell in love. You invest that much time and effort into something and you will instill some of your own being into it.
That leads me to where I sit today. There was no package from Randakk last winter that would have kept me happily busy as I prepared the bike for this most beautiful day. It's a day to ride. Not to go anywhere, just to go. I digress.
This thread is about getting my gorgeous bike running smoothly. She goes strong above 2,000 RPM but will not idle, just chokes and pukes. I've done everything I can to clear this up: Octane's Carb cleaning, lazy but fast and furious.-) MMO, Marvel Mystery Oil; Seafoam; and I've even prayed and talked to her at some length. Alas, she sat for over ten years and needs more attention than that. So, off we go with pictures and pointers and a paragraph tellin' what each one is (thank you Arlo).
Reminder: Left/Right as if you're sitting on the bike!
Out Damn Carbs, Out!
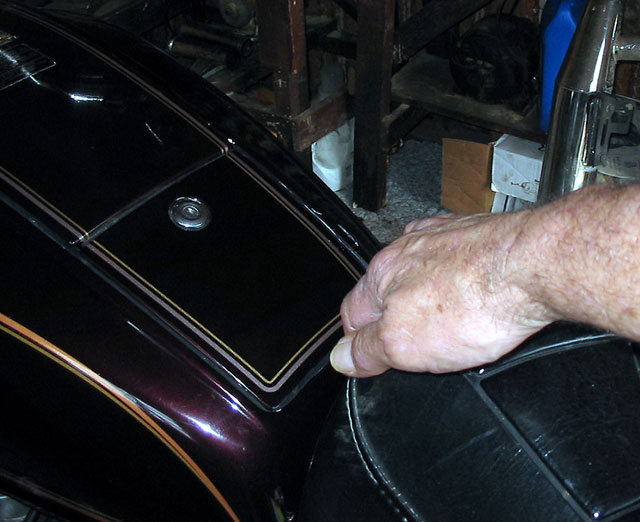
Get the Seat Off
1. Remove the 6mm Allen bolt on the right and the 8mm Allen on the left. There's a spring and adjuster handle on the left. Take out the bolt and spring and let the adjuster fall out the bottom. Put these parts in your bin #1.

2. Grab the front of the seat and slide it to the rear. Then lift the front, push it forward and lift it off. Stow it someplace safe.
Remove the Shelter
3. Remove the tool/junk tray.
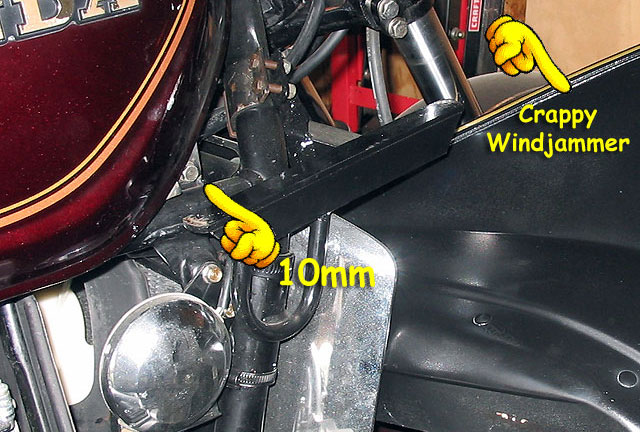
4. Take out the 2 - 10mm hex bolts holding the front of the shelter, one on the left and one on the right. Into bin #1 or back into the holes they came out of. I took off the crappy Windjammer and will be having a bonfire in my back yard.
5. Remove the two 12mm hex bolts from the outside of the rear shelter bracket. Into bin #1 or back in the holes.
6. Carefully lift the shelter, jiggle it left, jiggle right, rear up, rear down (in no particular order) until you can pull it clear of the bike. Store it someplace safe.
Remove the Air Filter and Intake Box
7. Spin off the wingnut (I said wingnut, uhhuhhuh), remove the top and lift out the filter. Fully loosen, but don't remove, the two 10mm bolts holding in the element retainer.
8. Lift up the airbox a bit so you can get to, and remove the two breather connections at the left and right rear.
9. Pull the whole thing out, bringing with it the airbox and rubber filter gasket.
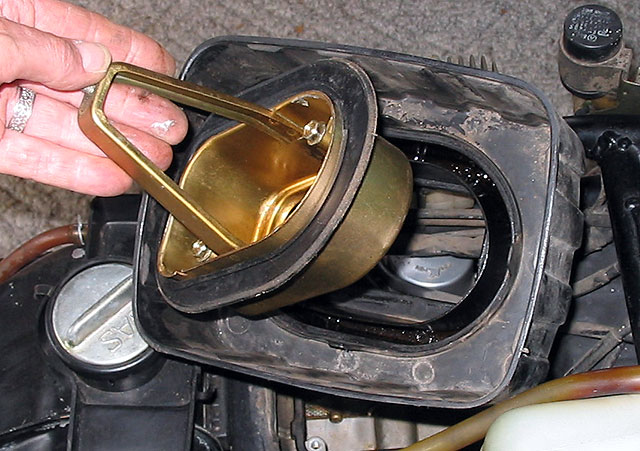
10. Grab the seal that's still on the top of the carb set. Stack all that stuff up in the correct order, spin the wingnut a few turns and stow it on a shelf.
Disconnect Plug Wires
11. Yank off (synonyms for 'remove' please) the plug wires and tie them up and out of the way. That's bailing twine but you could use a piece of wire off your old wiring harness, some string or an old shoelace.
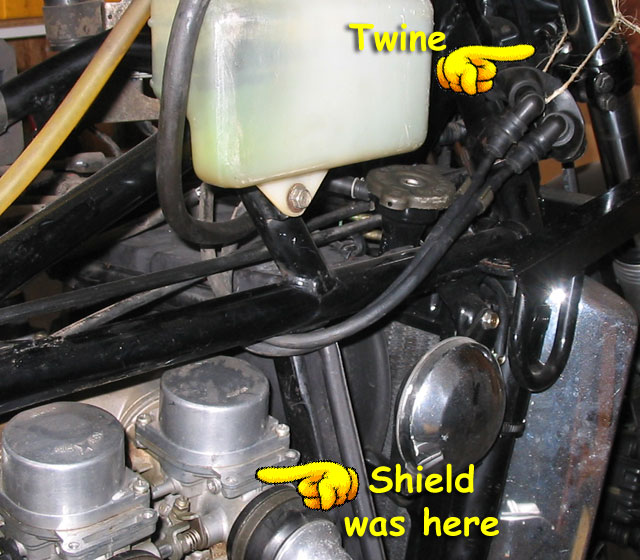
12. Remove the 8 - 8mm bolts holding the plug wire shields to the tops of the carbs, 4 per side. I started a new bin here for things in this new phase. So these go into bin #2.
Unhook Hoses and Cables
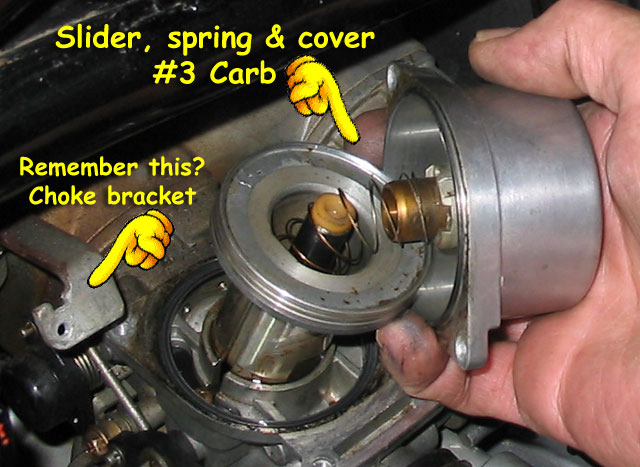
13. Remove the Phillips head screw and bracket that hold the choke cable. This is at the rear of #3 carb (that means; the rear of the right rear carb). Both pieces into bin #2.
14. Pull the cable toward you to line up with the slot and slide the little puck out. Shove the cable out of the way. (This same type of connection is used on both throttle cables.)
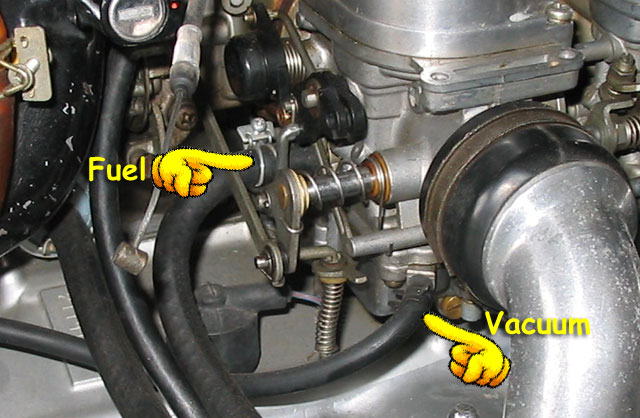
15. Disconnect the fuel and vacuum lines from the rear of #3 carb. Push them back out of the way.
16. Remove the 8 - 10mm cap head bolts that hold the intake manifolds to the heads. There are two on each manifold. Bolts go in bin #2.
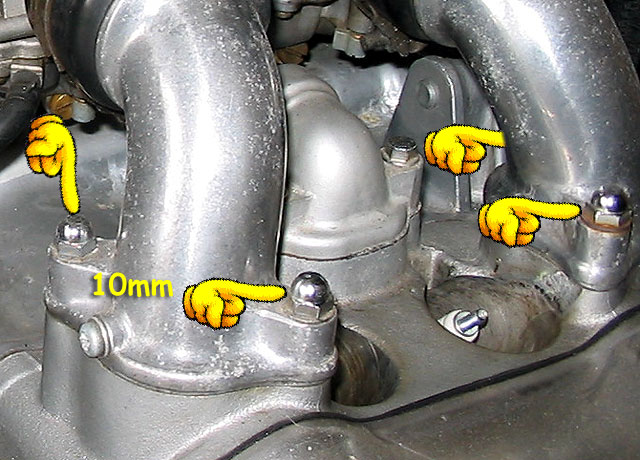
17. Pull up a little on an intake manifold and tap it lightly with a rubber hammer. The pair should pop off easily, don't pry with anything. Do the same on the other pair of manifolds.
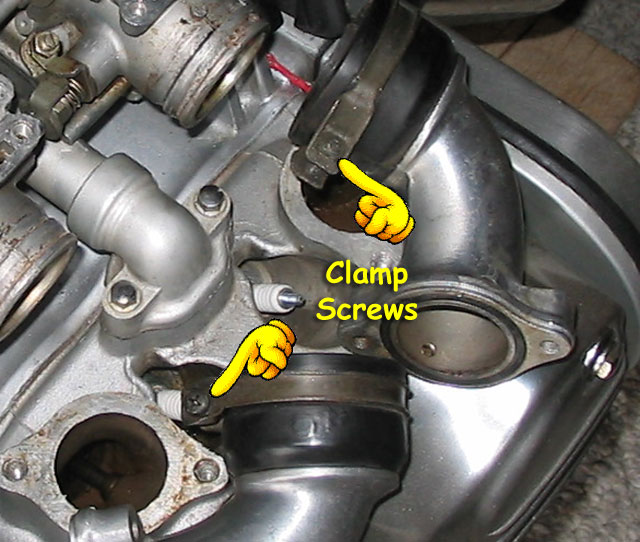
18. Loosen the Phillips head screws on the clamps that hold the rubber boots to carbs #1 and #3. Work the #1 and #3 manifolds, with their rubber boots, off of these two carbs.
19. Remove the two Phillips head screws on #1 vacuum chamber cover (top of the carb) and lift off the cover. Remove the spring and vacuum slide. Repeat for carb #3's cover. Keep these screws, slides and covers separate, number them, put them in special bins ... whatever ... they must go back into the same carb they came out of.
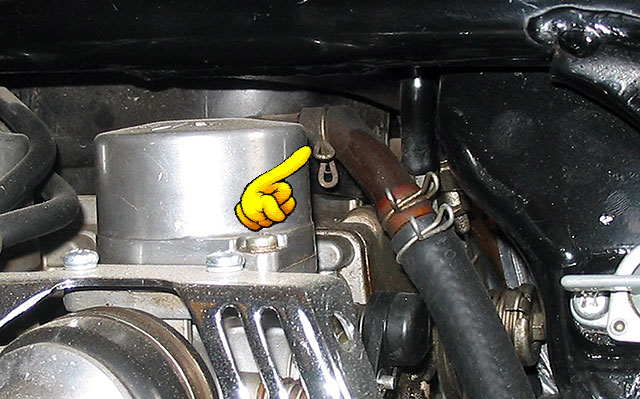
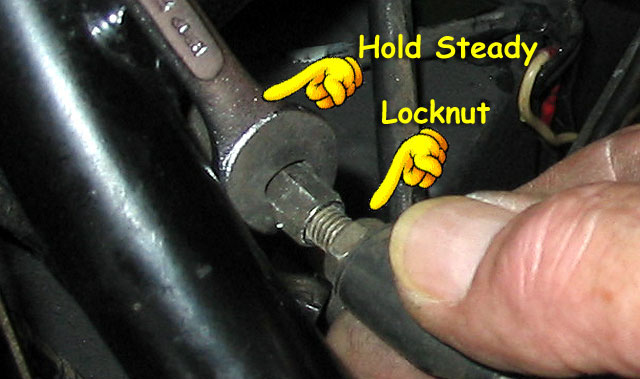
20. Locate the inline adjuster that's on one of the two throttle cables. It's in the hole where your airbox used to be, on the left side. Hold the long hex fitting steady and loosen the locknut. Turn it back as far as you can. Still holding steady ... use your thumb & forefinger to turn the cable into the fitting as far as it will go.
21. Slide the carb set as far as you can to the right side, the throttle assembly will contact the gas tank so it's not very far.
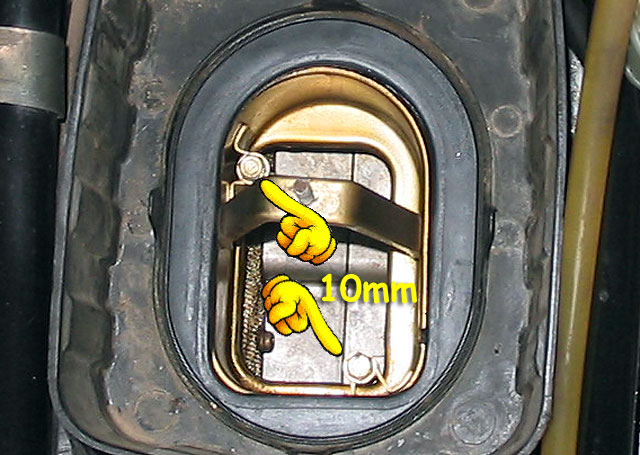
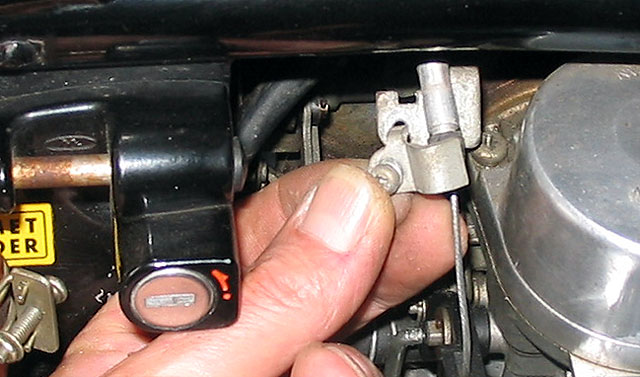
22. Make sure your throttle handgrip (the right one ... on the handlebar) is fully closed. Then, carefully slip the tip of a long, thin screwdriver under the bottom cable (1 in pic). Pull it toward you gently until (2) the cable lines up with the slot. Push on the right side of the puck (3) with long-nosed pliers then use them to grab the other side of the puck and pull it out.
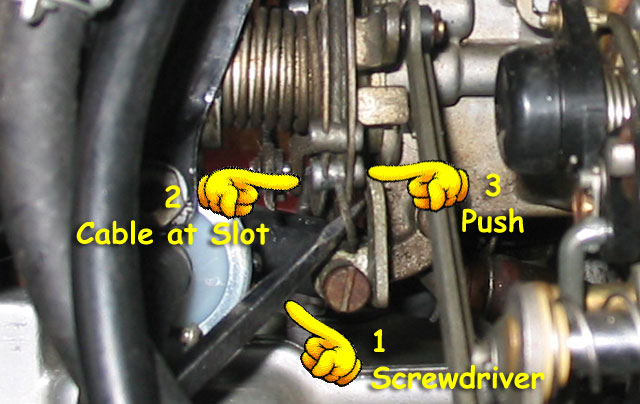
23. Repeat that step for the top cable.
24. Slide the carb set as far as you can to the left, the throttle cables will stop you.
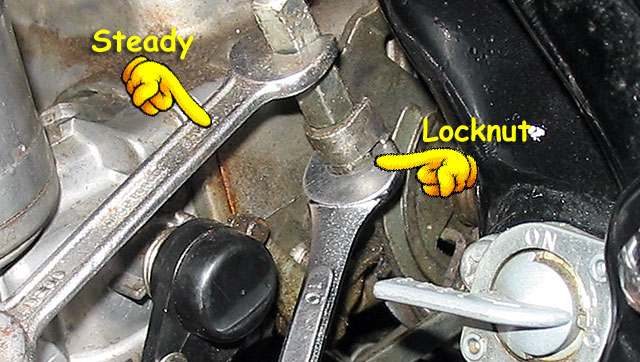
25. Using 2 - 10mm open end wrenches, hold the top of the throttle cable adjuster steady. Loosen the locknut at the bottom and turn it all the way off until it slides down the cable. It'll stop at the puck.
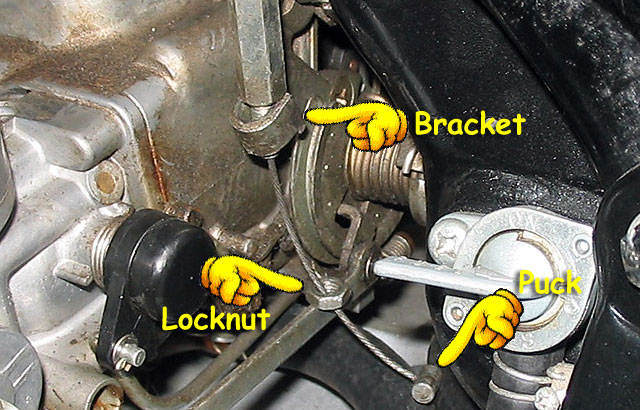
26. Work the adjuster out of the bracket and pull the cable free.
27. Now slide the carb set back to center
27. This other cable adjuster requires that you are a tiny Japanese person or a contortionist. I am neither, so I did a lot of cussing. Finagle your way down through the top and remove the second adjuster and locknut. Free the cable.
29. The carbs are now free to leave the building.
30. Carefully and patiently, jiggle and wiggle the carbs out the left side. In no particular order, lift and lower the front, left, right, rear and get them out without scratching the parts that you've already (so lovingly) polished, painted and primped. Stick clean-ish rags into the intake holes in the heads.
31. Get to the bench and replace the slides, springs and caps on carbs #1 and #3. Turn in the screws but not too tight.
32. Drain the float bowls into a suitable container.

33. Go treat yourself to some ice cream.
Click Here to get the printer friendly PDF of Carb Removal, '81 GL1100.
 PDF Reader FREE, small, quick: replaces Adobe Reader (2.6 MB, Windows only)
Now, go on to the next phase in this project by Clicking Here. You'll jump to the thread: Carburetor Overhaul, GL1100
The Rehab
10 Rules for Rehabbing Anything
I dove into this project with my usual, optimistic attitude. "I'll open up these carbs, clean out some jets, get the varnish out of there and she'll be idling properly in a couple of days." When I narrowed down where the idle jets where and got on the right track to clean them out, I found the real problem. Shot air cutoff valves and plugged idle jets. That meant that I had to do the full overhaul.
Some very nice things have come out of this. My lovely bride now knows that I will not be selling this bike. She is happy for me. And I got to order one of these:
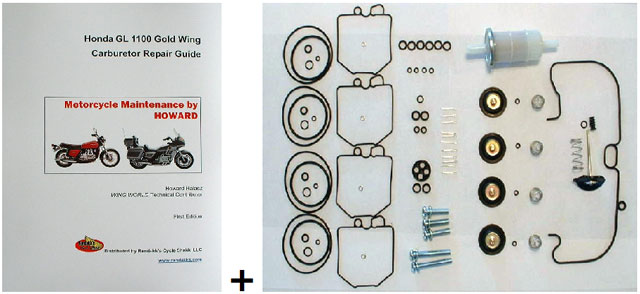
Howard Halsaz' GL1100 Carburetor Repair Guide + Randakk's Honda GL1100 Carb Overhaul Master Kit
The wife has her horse and we own a 1900 house on 5 acres. So, not only am I house-poor, I'm also horse-poor. And three years after my 3rd house "flip", I'm still paying off the credit cards. The original intention when I got this '81 Standard was to clean it up and sell at a profit. I even put together an elaborate thread called Flip This Bike! (Craigslist 2 eBay). But, somewhere along the way I fell in love. You invest that much time and effort into something and you will instill some of your own being into it.
That leads me to where I sit today. There was no package from Randakk last winter that would have kept me happily busy as I prepared the bike for this most beautiful day. It's a day to ride. Not to go anywhere, just to go. I digress.
This thread is about getting my gorgeous bike running smoothly. She goes strong above 2,000 RPM but will not idle, just chokes and pukes. I've done everything I can to clear this up: Octane's Carb cleaning, lazy but fast and furious.-) MMO, Marvel Mystery Oil; Seafoam; and I've even prayed and talked to her at some length. Alas, she sat for over ten years and needs more attention than that. So, off we go with pictures and pointers and a paragraph tellin' what each one is (thank you Arlo).
Reminder: Left/Right as if you're sitting on the bike!
Out Damn Carbs, Out!
Get the Seat Off
1. Remove the 6mm Allen bolt on the right and the 8mm Allen on the left. There's a spring and adjuster handle on the left. Take out the bolt and spring and let the adjuster fall out the bottom. Put these parts in your bin #1.
2. Grab the front of the seat and slide it to the rear. Then lift the front, push it forward and lift it off. Stow it someplace safe.
Remove the Shelter
3. Remove the tool/junk tray.
4. Take out the 2 - 10mm hex bolts holding the front of the shelter, one on the left and one on the right. Into bin #1 or back into the holes they came out of. I took off the crappy Windjammer and will be having a bonfire in my back yard.
5. Remove the two 12mm hex bolts from the outside of the rear shelter bracket. Into bin #1 or back in the holes.
6. Carefully lift the shelter, jiggle it left, jiggle right, rear up, rear down (in no particular order) until you can pull it clear of the bike. Store it someplace safe.
Remove the Air Filter and Intake Box
7. Spin off the wingnut (I said wingnut, uhhuhhuh), remove the top and lift out the filter. Fully loosen, but don't remove, the two 10mm bolts holding in the element retainer.
8. Lift up the airbox a bit so you can get to, and remove the two breather connections at the left and right rear.
9. Pull the whole thing out, bringing with it the airbox and rubber filter gasket.
10. Grab the seal that's still on the top of the carb set. Stack all that stuff up in the correct order, spin the wingnut a few turns and stow it on a shelf.
Disconnect Plug Wires
11. Yank off (synonyms for 'remove' please) the plug wires and tie them up and out of the way. That's bailing twine but you could use a piece of wire off your old wiring harness, some string or an old shoelace.
12. Remove the 8 - 8mm bolts holding the plug wire shields to the tops of the carbs, 4 per side. I started a new bin here for things in this new phase. So these go into bin #2.
Unhook Hoses and Cables
13. Remove the Phillips head screw and bracket that hold the choke cable. This is at the rear of #3 carb (that means; the rear of the right rear carb). Both pieces into bin #2.
14. Pull the cable toward you to line up with the slot and slide the little puck out. Shove the cable out of the way. (This same type of connection is used on both throttle cables.)
15. Disconnect the fuel and vacuum lines from the rear of #3 carb. Push them back out of the way.
16. Remove the 8 - 10mm cap head bolts that hold the intake manifolds to the heads. There are two on each manifold. Bolts go in bin #2.
17. Pull up a little on an intake manifold and tap it lightly with a rubber hammer. The pair should pop off easily, don't pry with anything. Do the same on the other pair of manifolds.
18. Loosen the Phillips head screws on the clamps that hold the rubber boots to carbs #1 and #3. Work the #1 and #3 manifolds, with their rubber boots, off of these two carbs.
19. Remove the two Phillips head screws on #1 vacuum chamber cover (top of the carb) and lift off the cover. Remove the spring and vacuum slide. Repeat for carb #3's cover. Keep these screws, slides and covers separate, number them, put them in special bins ... whatever ... they must go back into the same carb they came out of.
20. Locate the inline adjuster that's on one of the two throttle cables. It's in the hole where your airbox used to be, on the left side. Hold the long hex fitting steady and loosen the locknut. Turn it back as far as you can. Still holding steady ... use your thumb & forefinger to turn the cable into the fitting as far as it will go.
21. Slide the carb set as far as you can to the right side, the throttle assembly will contact the gas tank so it's not very far.
22. Make sure your throttle handgrip (the right one ... on the handlebar) is fully closed. Then, carefully slip the tip of a long, thin screwdriver under the bottom cable (1 in pic). Pull it toward you gently until (2) the cable lines up with the slot. Push on the right side of the puck (3) with long-nosed pliers then use them to grab the other side of the puck and pull it out.
23. Repeat that step for the top cable.
24. Slide the carb set as far as you can to the left, the throttle cables will stop you.
25. Using 2 - 10mm open end wrenches, hold the top of the throttle cable adjuster steady. Loosen the locknut at the bottom and turn it all the way off until it slides down the cable. It'll stop at the puck.
26. Work the adjuster out of the bracket and pull the cable free.
27. Now slide the carb set back to center
27. This other cable adjuster requires that you are a tiny Japanese person or a contortionist. I am neither, so I did a lot of cussing. Finagle your way down through the top and remove the second adjuster and locknut. Free the cable.
29. The carbs are now free to leave the building.
30. Carefully and patiently, jiggle and wiggle the carbs out the left side. In no particular order, lift and lower the front, left, right, rear and get them out without scratching the parts that you've already (so lovingly) polished, painted and primped. Stick clean-ish rags into the intake holes in the heads.
31. Get to the bench and replace the slides, springs and caps on carbs #1 and #3. Turn in the screws but not too tight.
32. Drain the float bowls into a suitable container.
33. Go treat yourself to some ice cream.
Click Here to get the printer friendly PDF of Carb Removal, '81 GL1100.
PDF Reader FREE, small, quick: replaces Adobe Reader (2.6 MB, Windows only)Now, go on to the next phase in this project by Clicking Here. You'll jump to the thread: Carburetor Overhaul, GL1100
The Rehab
10 Rules for Rehabbing Anything
- 1. If it ain't broke, don't fix it.
2. RTFM (read the f***ing manual), all of them.
3. Clean and organize the workspace and parts.
4. Clean up the mess you made cleaning it up.
5. Righty tighty, lefty loosey
6. Loosen and tighten gradually and in sequence.
7. There is such a thing as too tight.
8. Use the correct tools that fit right.
9. Put things back where you got them.
10. See rule #1, it should be If it ain't broke, don't fix it!.
I dove into this project with my usual, optimistic attitude. "I'll open up these carbs, clean out some jets, get the varnish out of there and she'll be idling properly in a couple of days." When I narrowed down where the idle jets where and got on the right track to clean them out, I found the real problem. Shot air cutoff valves and plugged idle jets. That meant that I had to do the full overhaul.
Some very nice things have come out of this. My lovely bride now knows that I will not be selling this bike. She is happy for me. And I got to order one of these:
Howard Halsaz' GL1100 Carburetor Repair Guide + Randakk's Honda GL1100 Carb Overhaul Master Kit
