danf
Well-known member
Thanks, there it is... Well, there's another option, thank you Dan, that's cool stuff right there..


You got a make, model , part number, or link to this wonderstat?dan filipi":2u80zu7i said:littlebeaver":2u80zu7i said:Dan has had this on his bike for some time now, I remember asking him about it way back when..I think he likes keeping it a secret or something...Dan can you tell more of this magical switch you have, I have seen no post of this yet... I'm sure their are lots of folks wanting to learn more about it..dan filipi":2u80zu7i said:Switch party :smilie_happy:
Yes by far the cheapest option but for me for less than $30 an adjustable is the way to go.
With the tstat in place you get the best all around, it will warm up to where it should then it can be adjusted to keep temp right at the bottom.
This is what I'm talking about
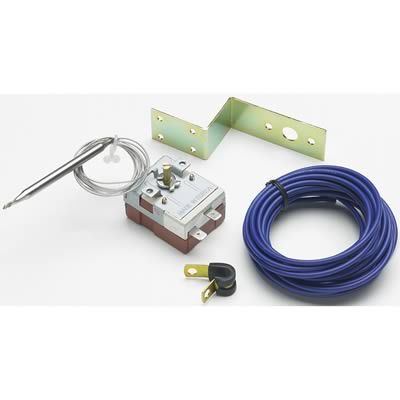
You wire it inline with the fan switch and mount the temperature bulb to the radiator with the supplied kit and there ya go.
I put the main control in the right fairing face panel for easy adjustments.
I've got it set to turn the fan on just past 1/2 on the gauge. When it comes on it cycles on and off in range much like the stock switch.
Dan, you should make a new thread and make it a sticky in the electrical or cooling parts section for easy access to this information in the future. This is the least expensive and easiest fix I've seen yet for the fan switch. (I know Joe....short of a manual toggle switch. :smilie_happy: )dan filipi":f9v823hk said:littlebeaver":f9v823hk said:Dan has had this on his bike for some time now, I remember asking him about it way back when..I think he likes keeping it a secret or something...Dan can you tell more of this magical switch you have, I have seen no post of this yet... I'm sure their are lots of folks wanting to learn more about it..dan filipi":f9v823hk said:Switch party :smilie_happy:
Yes by far the cheapest option but for me for less than $30 an adjustable is the way to go.
With the tstat in place you get the best all around, it will warm up to where it should then it can be adjusted to keep temp right at the bottom.
This is what I'm talking about
You wire it inline with the fan switch and mount the temperature bulb to the radiator with the supplied kit and there ya go.
I put the main control in the right fairing face panel for easy adjustments.
I've got it set to turn the fan on just past 1/2 on the gauge. When it comes on it cycles on and off in range much like the stock switch.
No it's not...mine is..cost zero.. silly Willey, it's the cheapest new one you can buy that works perfectly for sure.... :smilie_happy:mcgovern61":34vhdvfr said:dan filipi":34vhdvfr said:littlebeaver":34vhdvfr said:Dan has had this on his bike for some time now, I remember asking him about it way back when..I think he likes keeping it a secret or something...Dan can you tell more of this magical switch you have, I have seen no post of this yet... I'm sure their are lots of folks wanting to learn more about it..dan filipi":34vhdvfr said:Switch party :smilie_happy:
Yes by far the cheapest option but for me for less than $30 an adjustable is the way to go.
With the tstat in place you get the best all around, it will warm up to where it should then it can be adjusted to keep temp right at the bottom.
This is what I'm talking about
This is the least expensive and easiest fix I've seen yet for the fan switch. (I know Joe....short of a manual toggle switch. :smilie_happy: )
Your right! Yours is the cheaper fix. :wave:littlebeaver":2crz91bn said:No it's not...mine is..cost zero.. silly Willey, it's the cheapest new one you can buy that works perfectly for sure.... :smilie_happy:
mcgovern61":2kbg1lix said:Your right! Yours is the cheaper fix. :wave:littlebeaver":2kbg1lix said:No it's not...mine is..cost zero.. silly Willey, it's the cheapest new one you can buy that works perfectly for sure.... :smilie_happy:
:smilie_happy: :smilie_happy: :smilie_happy:littlebeaver":3o63s14a said:Or Or someone could also just buy a new oem switch at the premium price.. :doh:
mcgovern61":2rahq0pw said:Dan, you should make a new thread and make it a sticky........
When I tested my switch, it was closing at 214 degrees (read with infra-red thermal reader). On my gauges, that is when my temp needle is at just about half (near straight up). My fan also really only comes on in stop and go traffic when the engine is heating up and there is no air passing through the radiator. I also checked my thermostat and it opens at 196 degrees and closes at 188 degrees.Retroyz":2qd1m4gn said:Reading forums on this topic, 212F sounded a little low, however I have since looked in the shop manual and it says the oem switch is designed to close at 208-216F (median 212F) so maybe the fan is supposed to run when the temp needle is at 1/3? Before, when my switch was bad, my temp gauge was always at about half, or needle straight up and would only go up in stop and go traffic.
Does anybody know what the operating temp of this engine in regards to where the temp guage needle should be .
Retroyz":yjpz9zl3 said:I think Dan has found the best option besides the OEM switch. I installed the Geo Metro switch which is supposed to kick on at 212F. Reading forums on this topic, 212F sounded a little low, however I have since looked in the shop manual and it says the oem switch is designed to close at 208-216F (median 212F) so maybe the fan is supposed to run when the temp needle is at 1/3? Before, when my switch was bad, my temp gauge was always at about half, or needle straight up and would only go up in stop and go traffic.
Does anybody know what the operating temp of this engine in regards to where the temp guage needle should be .
On a related note, when I was replacing this switch, I removed the heat shield for easier access and left it off for future ease of maintenance because it was such a pain to remove. It is now obvious to me that it is there for rider comfort - to keep the heat off you-and not for engine cooling. I have read where some guys remove this to keep air moving across the engine - sure but you are but it is hot air. I am going to put it back on, but have cut it in half so that I won't need to remove the radiator and fan to get it out.
I have switched between engines, radiators and fan switches between swaps and my fan has always kicked in at the same place on the gauge.......of course, assuming the gauge is correct. It only goes as high as 3/4 during 95+ temps and stop and go traffic with the fan running.dan filipi":i0oswecd said:I've found from observing a few 1100's the fan should come on at 3/4 gauge then off at a bit below 1/2 gauge. This is with a gauge that's reading accurately.
joedrum":20n9shxl said:gee strying t think of somhing sarcaskic to say but couldnt think of anything imst be feeing somwhat better but my sarcasim still need to recover :mrgreen:
Enter your email address to join: